iPhone like toggle layer
In a project I work on a need arose to have iPhone like on/off switch including the animation. Since I already use Core Animation for other purposes, a custom layer was immediate choice. I was bit surprised by not being able to find an example on internet, so I rolled out my own. In this post I’ll demonstrate the implementation I chose.
The plan
The plan is simple - create the necessary CALayer hierarchy and then change layer positions as needed. Since most CALayer properties are animated, the slide in and out will be handled automatically for us by Core Animation. Toggle states are represented by CATextLayer and clients can change each text through exposed properties. All set, so let’s dive into the solution…
The solution
There are several possible solutions. In the end I chose custom layout manager. This resulted in very simple code and what’s even more important - automatic sublayers resizing when the main layer size would change. The most obvious resize handling is changing main layer width. In such case the state layers should resize their widths so that they cover the whole area minus the thumb. And since we want to keep the thumb square, we should also handle vertical resizes properly - in such case the thumb width and height changes and the state layers should also change accordingly. Since layer sice invokes layout, this is automatically handled in by our custom layout manager.
The layers hierarchy layout looks like this:
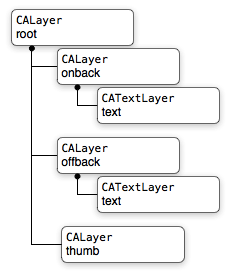
The solution shown here uses NSGradient to draw on and off gradients.
The whole drawing happens in the main GBToggleLayer layer which also
works as the layout manager for it’s children. The texts are handled by
CATextLayer with some shadow applied to make it nicer looking.
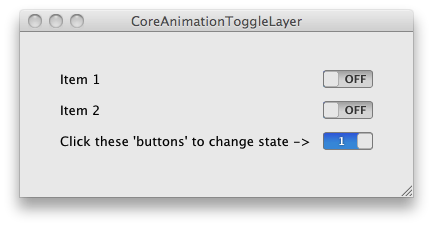
Here’s how the layers looks like in actual application:
Custom layout manager implementation
The creation of layers and sublayers is straightforward, so let’s
concentrate on more interesting pieces. First let’s see how custom
layout is handled. The first thing we need to do is setup the layout
manager. As mentioned above, the main GBToggleLayer handles layout
itself - the reason is that we want to make the layer self-contained -
just add it to the layer hierarchy, optionally set up the parameters and
it should work. So in the initializer we simply assign ourself as the
layout manager like this:
- (id) init
{
    self = [super init];
    if (self != nil)
    {
        ...
        self.layoutManager = self;
        ...
    }
    return self;
}
The layout manager should implement one required method which is
layoutSublayersOfLayer:. This is the code that handles the layout:
- (void) layoutSublayersOfLayer:(CALayer*)layer
{
    CGFloat contentsHeight = self.contentsHeight;
    CGFloat stateWidth = self.bounds.size.width - contentsHeight;
    CGFloat stateDrawExtra = self.thumbLayer.cornerRadius / 2.0f;

    CGFloat left = self.toggleState ? 0.0f : -stateWidth;
    CGFloat middle = self.bounds.size.height / 2.0f;

    self.onBackLayer.bounds = CGRectMake(0.0f, 0.0f, stateWidth + stateDrawExtra, contentsHeight);
    self.onBackLayer.position = CGPointMake(left, middle);
    left += stateWidth;
    self.thumbLayer.bounds = CGRectMake(0.0f, 0.0f, contentsHeight, contentsHeight);
    self.thumbLayer.position = CGPointMake(left, middle);
    left += contentsHeight - stateDrawExtra;
    self.offBackLayer.bounds = CGRectMake(0.0f, 0.0f, stateWidth + stateDrawExtra, contentsHeight);
    self.offBackLayer.position = CGPointMake(left, middle);
}
Straightforward - depending current state we set layers left position.
And since position is animated, the layers automatically slide left or
right when the value changes. Notice how we extend on and off state
background layers below the thumb layer. If this would not be done so,
we would end with background see through behind the thumb curvature
(force stateDrawExtra to 0 to see the effect).
Using GBToggleLayer
Adding GBToggleLayer to Core Animation hieararchy is straightforward:
GBToggleLayer* layer = [GBToggleLayer layer];
[layer setValue:[NSNumber numberWithFloat:50.0f] forKeyPath:@"frame.size.width"];
[layer setValue:[NSNumber numberWithFloat:18.0f] forKeyPath:@"frame.size.height"];
[superlayer addSublayer:layer];
We simply set the desired layer size and we’re off. The layer is designed to use default texts but you can change these like this:
layer.onStateText = @"1";
layer.offStateText = @"0";
To change the state use: layer.toggleState = YES;. There’s also a
helper method to reverse the toggle state: [layer reverseToggleState].
To make the layer respond to user’s interaction, we need to go to the
view that hosts layers. For this example it’s very simple - handle mouse
down event, hit test the layers to determine if a GBToggleLayer was
hit and reverse the toggle state of the clicked layer. The code that
does this is self-explanatory, see ContentsView in included Xcode
project.
Conclusion
The layer may have limited use in it’s current implementation, depending
your needs. But it should not present a lot of effort to extend. For
example all the colors and other drawing parameters are hard-coded. It
should be very easy to open these as public properties so client code
can change parameters on individual layers. A single GBToggleLayer can
also be added to a custom NSView together with user interaction handling
and use it in AppKit view hierarchy, again a simple extension. It would
also make sense to change the color of thumb while the mouse is down and
reverse the state only in mouse up. You can also replace the custom
drawn background CALayer and it’s CATextLayer child with a single
CALayer that uses an image for it’s contents.
Note that the layers state is changed directly in the example. In real world application the state would be probably bound to a model data, so clicking on a layer would actually change the state of the model and this would change the layer state through KVO. I’ll live this for the readers. Or perhaps I can do it in a later post if there’ll be enough interest…