View based table views in Lion - part 1 of 2
With OS X 10.7 Lion, Apple has introduced many cool features to it’s AppKit. One of those that caught my attention right away, was view based table views. It seemed like the missing widget I was looking for when implementing Startupizer’s items list. So I decided to take a spin as a research for directions for 2.0 release. In this post, I’ll go step by step through a small project gradually adding features until it will look similar to current main window.
The application we’ll build will scan your Applications folder and will use table view to display icon, name and type of the item. The model layer is quite simple: is consists of an array of Item objects, each object representing a single application. I’m not going to explain the code here, take a look at the sample code below if you’re interested.
This post assumes you’re accustomed to cell based table views, controller classes and bindings. If you’re just looking for quick reference, just go over steps at the start of each chapter, but if you’re more on the beginner side, feel free to read through the rest of it - I also did my best to explain some of the reasons and alternative methods in there.
The basics
Steps at a glance:
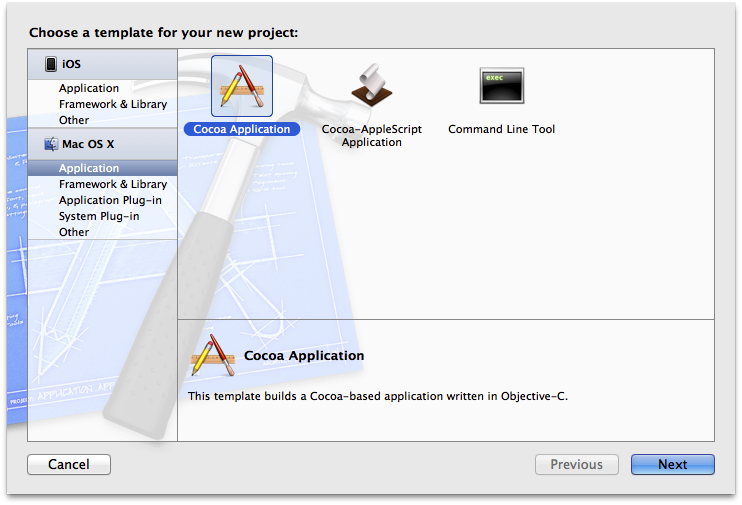
- Create new cocoa application
To start, create a new Cocoa Application and enter all details. I’ve chosen non-document based app for simplicity sake. Here are the screenshots:

Once you confirm project template you can run your shiny new project - it should show an empty window. Not much going on right now, but it’s fine starting point for adding our table based stuff. We’ll start with interface builder, so open MainMenu.xib and select the window from top level objects as shown on this screenshot:
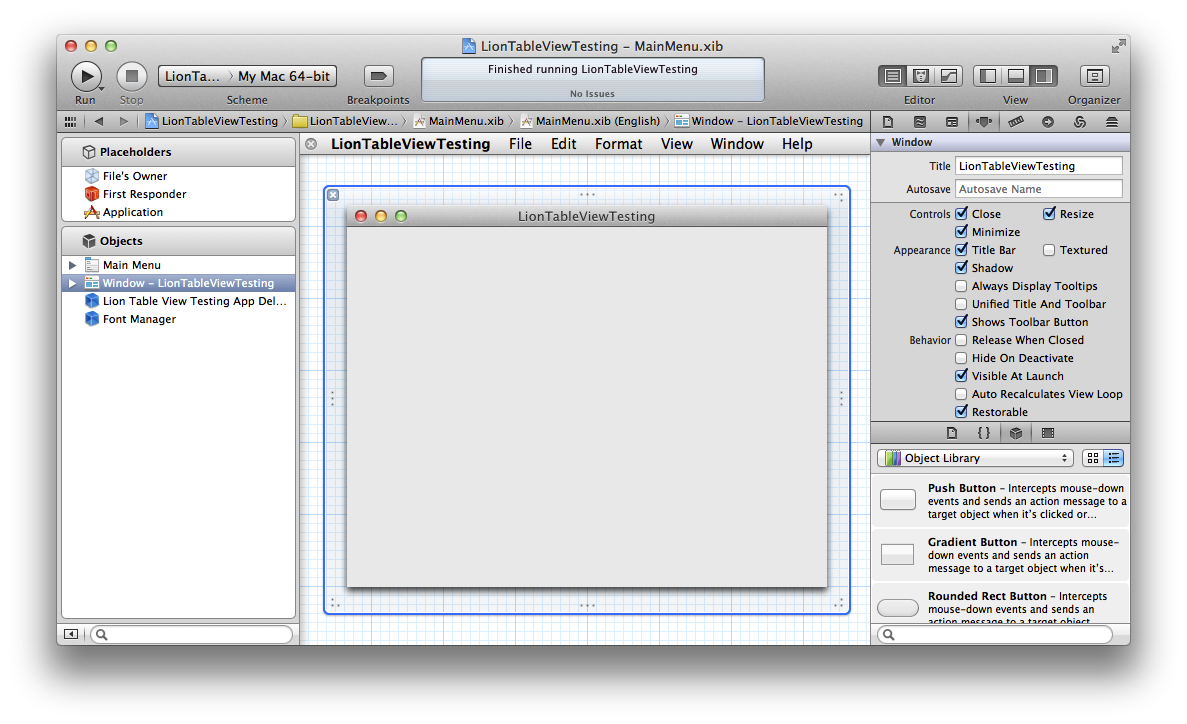
Note that I use expanded layout as I find it simpler to drill down view hierarchy once it gets more complex. I only have navigators and utilities views visible when I need them. In fact, I’ve setup behaviors to automatically show and hide appropriate navigators and utility views when performing various actions such as building, debugging etc. If you’re not familiar with this, I suggest going over Maximizing Productivity in Xcode 4 WWDC 2011 video to get to speed with this great feature.
Add the table view
Steps at a glance:
- Drag table view from objects library
- Setup table view attributes as needed
So now we’re ready to setup our table view. Start by dragging it from object library and position it to your preference. I’ve chosen to have it fit the whole window and have it auto resize with the window:


Note that I used the old style auto resizing masks here for simplicity. If you’re targeting Lion, you should definitely have a look at auto layout, it’s much more advanced, but it would distract us from the main goal here. Perhaps I’ll write about it in a future post.
Next, I setup the table view to fit my needs - I removed second column and headers and made it resize first column - all standard stuff, not different from how we were dealing with tables up until now. Here’s the screenshot for reference:

Setup table view for view mode
Steps at a glance:
- Change table view content mode to view based
- Drag image & text table cell view from objects library
- Delete original text cell view
- Change cell view height to 34 pixels
- Drag a label from objects library
- Change label size to mini and position it below the large label
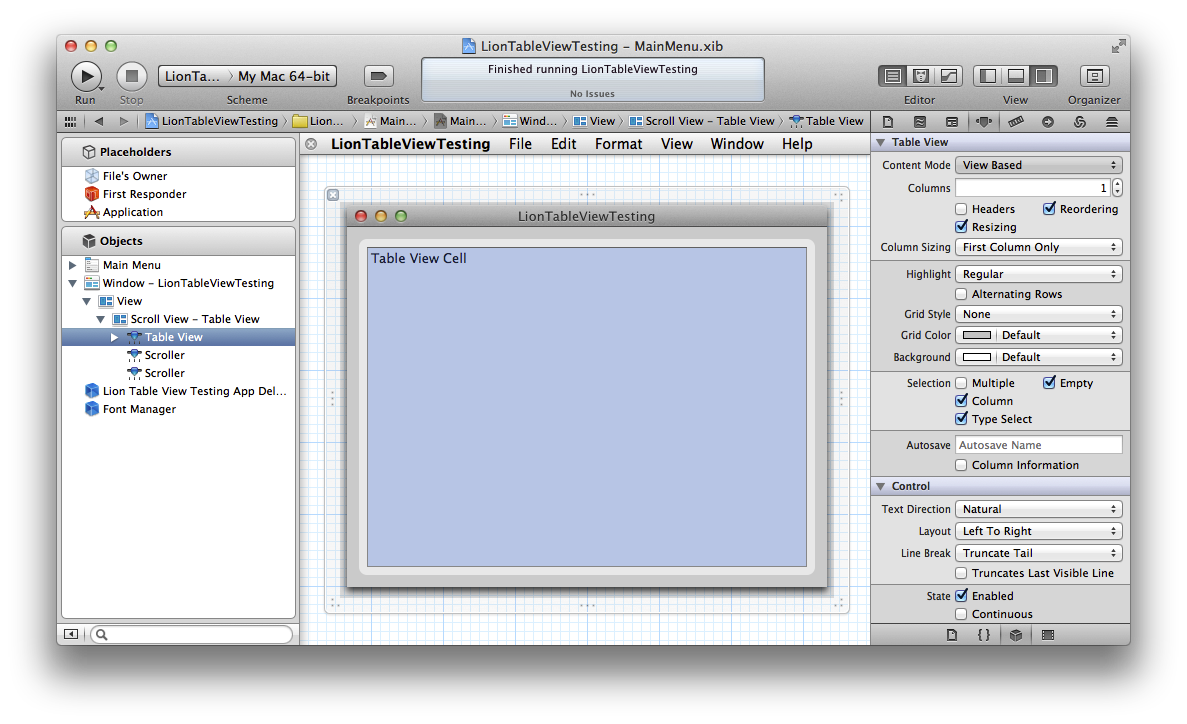
Ok, so now we start stepping into view based table mode. As the first step, we have to change the mode in Interface Builder. Select the table and change Content Mode to View Based as shown on screenshot:
We’re now ready to layout the cells. As mentioned above, we’ll make them similar to current Startupizer layout, with icon on the left, item display name label on top with smaller, dimmed item kind label at the bottom. Actually, this is quite common scenario, so I can imagine other uses for this as well. Although we could setup table cell view from scratch, I like to reuse stuff whenever possible. And sure, you can find Image & Text Table Cell View in object library, which seems like a good starting point, so let’s drag one to the table, just drop it on the table and you’ll end with two cells, the original, text only and the new one. We don’t need original one, so delete it - select it and press backspace. Your screen should look like this:

Note that using default cell view has several additional advantages over
custom view. Among others, NSTableCellView already provides
textField and imageView properties linked with the cell you dragged
to your table view. Additionally, these two are already setup as hints
for accessibility.
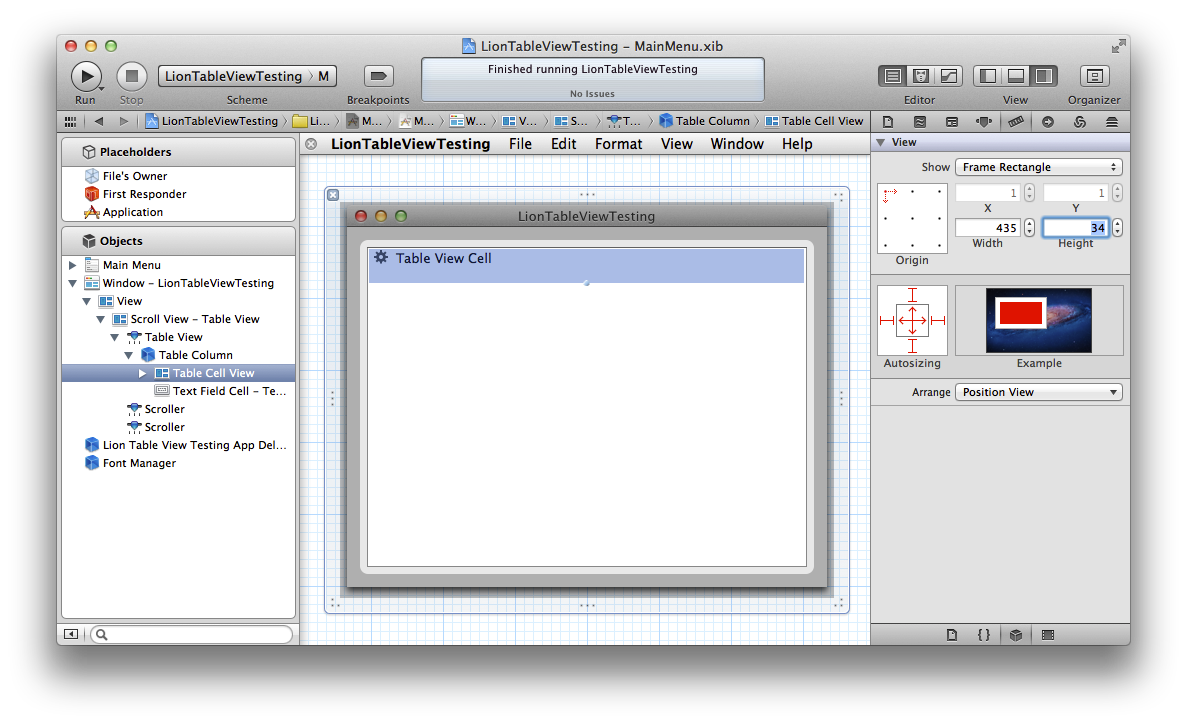
Nice, but we want to have it taller with additional text view. For start, let’s change table cell view’s height to 34 pixels: select the cell, go to size inspector and change the height to 34 as shown below (alternatively you could drag the cell view by it’s bottom handler directly within the table view, I chose to enter manually to allow entering exact size as I knew it in advance). To add additional views to cell, simply drag them from object library. For our purpose, drag a label and position it below the top one. Also setup it’s autoresize mask to have it resize with our view. Oh, while inside size inspector, also change it’s size to small or mini (I’ve chosen mini):
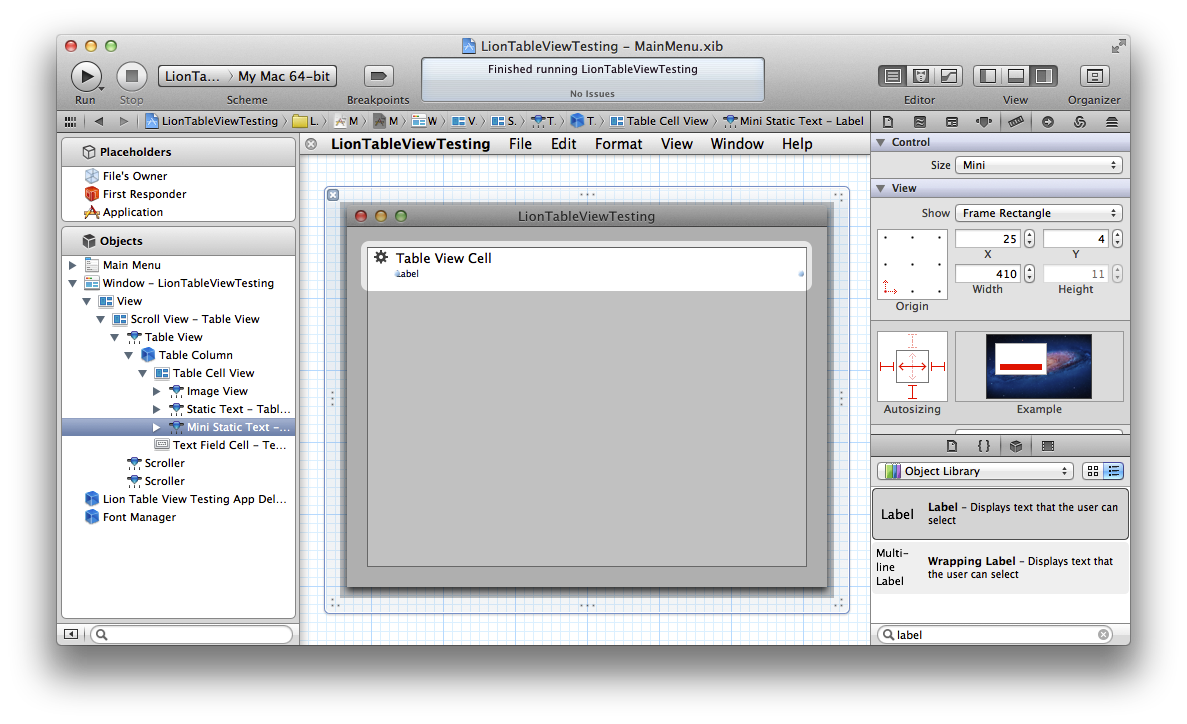
Now it’s time to layout the rest of the cell: first we want to have larger 32x32 pixel icon and secondly, we want to have details label less visible. To satisfy first, I entered the correct size and moved the label to (2,2) in size inspector. I also changed the icon to NSApplicationIcon (in attributes inspector) to make it better fit. To tackle second, select the label and change it’s Text Color in attributes inspector. I chose Control Shadow Color (note that you can choose system predefined colors by clicking on the right side of the combo, if you click on color swatch, you get standard system color picker where you can select any color). Here’s how my finished table
cell view looks like:
Setup table data source and delegate
Steps at a glance:
- Setup app delegate as the data source and delegate of table view
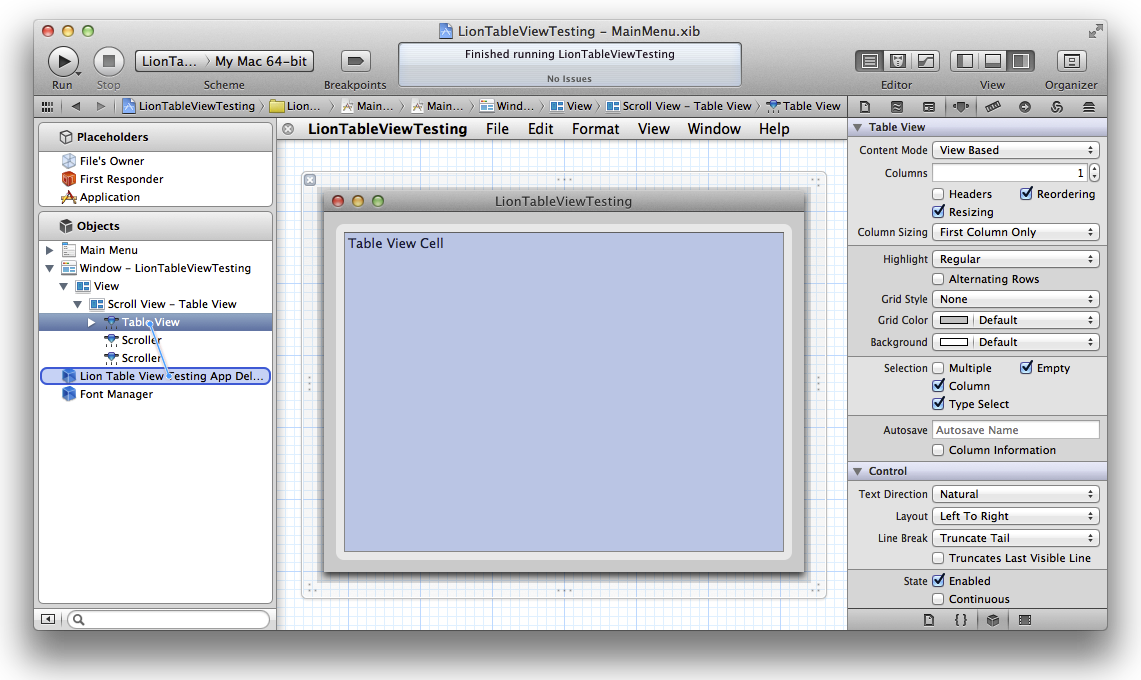
Almost done in Interface Builder now. We still need to setup table view’s data source and delegate. For the sake of simplicity, I’ve chosen to have our app delegate handling the table as well. Control drag from table view to app delegate to set it up as both, the data source and delegate:
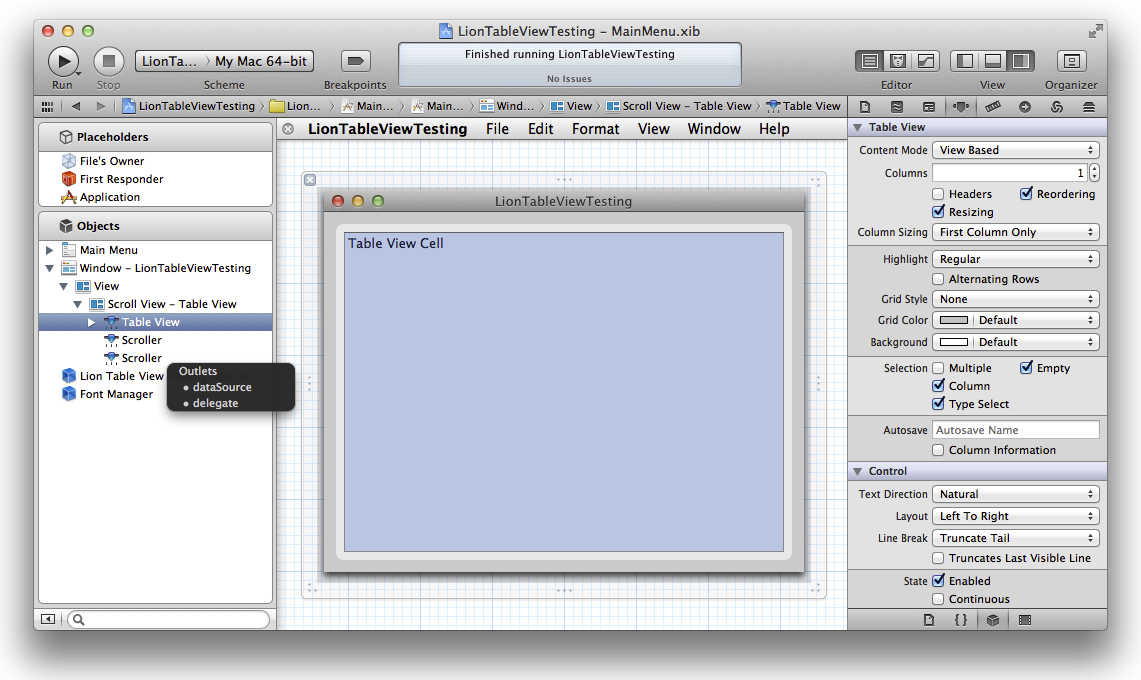
Note that for the sake of this tutorial, we don’t need the table view
instance outside the data source and delegate methods, so we don’t have
to setup IBOutlet, but in most real apps, you’re likely need to do
this step too, the most common scenario would be to reload the table
when model changes.
Get data to the table (example 1)
Steps at a glance:
- Write
numberOfRowsInTableView:method in app delegate - Write
tableView:viewForTableColumn:row:method in app delegate
Finally getting our hands dirty with some coding! For view based table
views, we need to implement the required data source methods
numberOfRowsInTableView: and tableView:viewForTableColumn:row:. We
use the array of Items which we lazily load (check the attached source
code for details). Here’s how the two methods look like:
- (NSInteger)numberOfRowsInTableView:(NSTableView *)tableView {
    return [self.items count];
}

- (NSView *)tableView:(NSTableView *)tableView viewForTableColumn:(NSTableColumn *)tableColumn row:(NSInteger)row {
    NSTableCellView *result = [tableView makeViewWithIdentifier:tableColumn.identifier owner:self];
    Item *item = [self.items objectAtIndex:row];
    result.imageView.image = item.itemIcon;
    result.textField.stringValue = item.itemDisplayName;
    return result;
}
Note that these methods are not needed when using bindings. In fact, you’ll see how much we can simplify the code when changing to bindings later on!
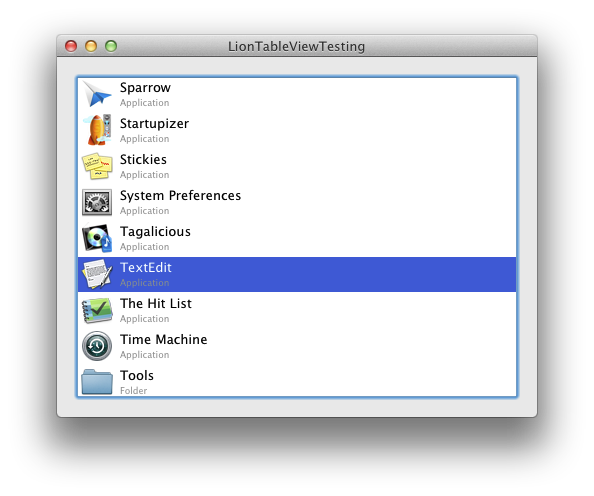
Running the code should result in something like this:
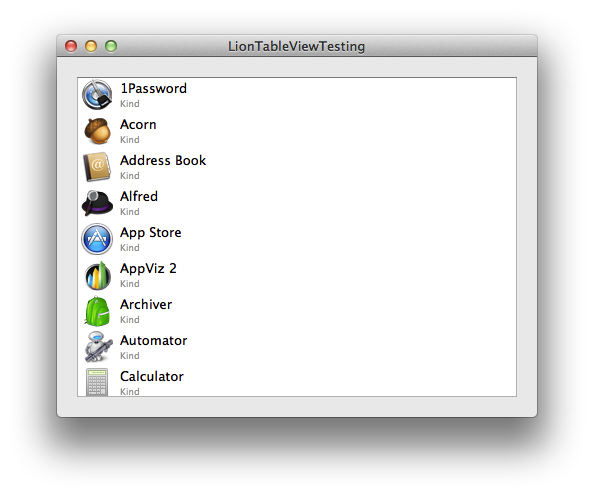
Cool! And that’s all it takes to have our simple custom view based table view! Check LionTableViewTesting1 project to see the whole source code.
Getting detail to the screen (example 2)
Steps at a glance:
- Create custom
NSTableCellViewsubclass namedItemCellView - Add
IBOutletproperty of typeNSTextField - Connect detail label with property in IB
- Update
tableView:viewForTableColumn:row:code to setup detail text from model
Noticed word “simple” at the end of previous chapter? No? Well, doesn’t
matter, here’s the deal - our app looks fine, but closer examination
shows an issue: detail labels all show text “Kind”, but our Item class
should return either “Application” or “Folder”. So the text from IB
remains. And sure enough, we didn’t set the kind string to details text
field in tableView:viewForTableColumn:row:… Let’s remedy this.
In order to access our custom label, we need to get it from the nib
file. And to do that, we have to resort to IBOutlet. And to do that,
we need to create our custom NSTableCellView subclass. So go ahead and
create a new class, I named it ItemCellView, here’s the header:
@interface ItemCellView : NSTableCellView
@property (nonatomic, retain) IBOutlet NSTextField *detailTextField;
@end
And the implementation:
@implementation ItemCellView
@synthesize detailTextField = _detailTextField;

- (void)dealloc {
    [_detailTextField release], _detailTextField = nil;
    [super dealloc];
}

@end
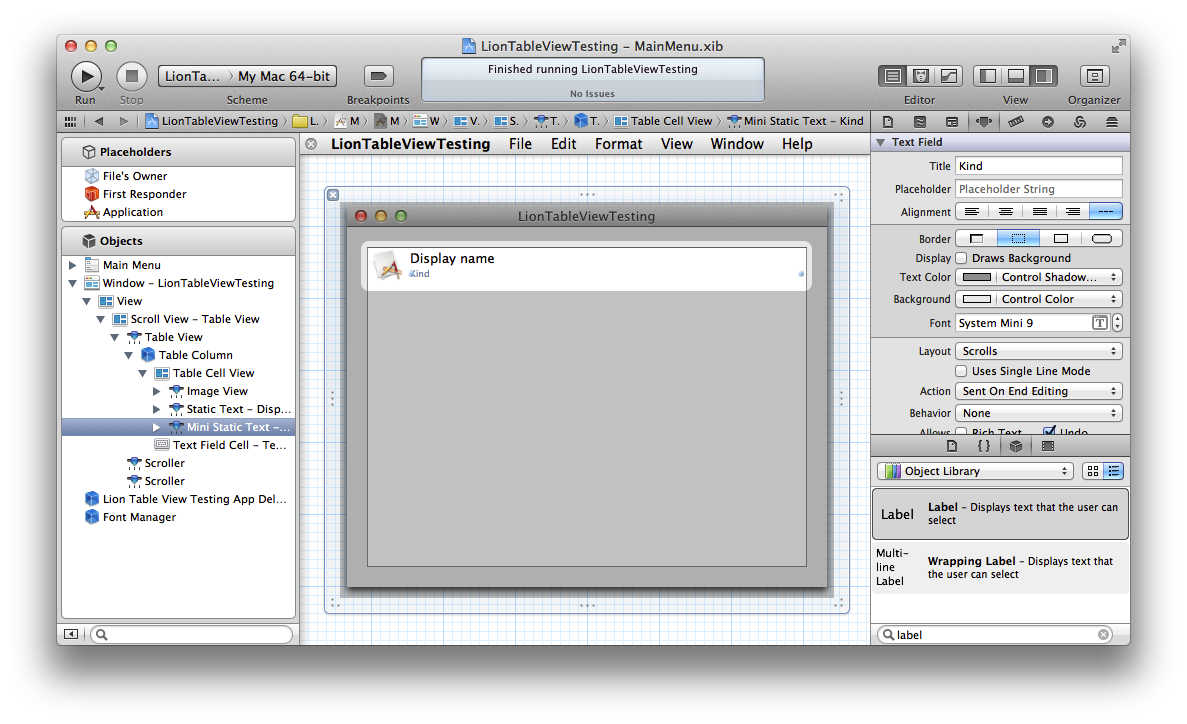
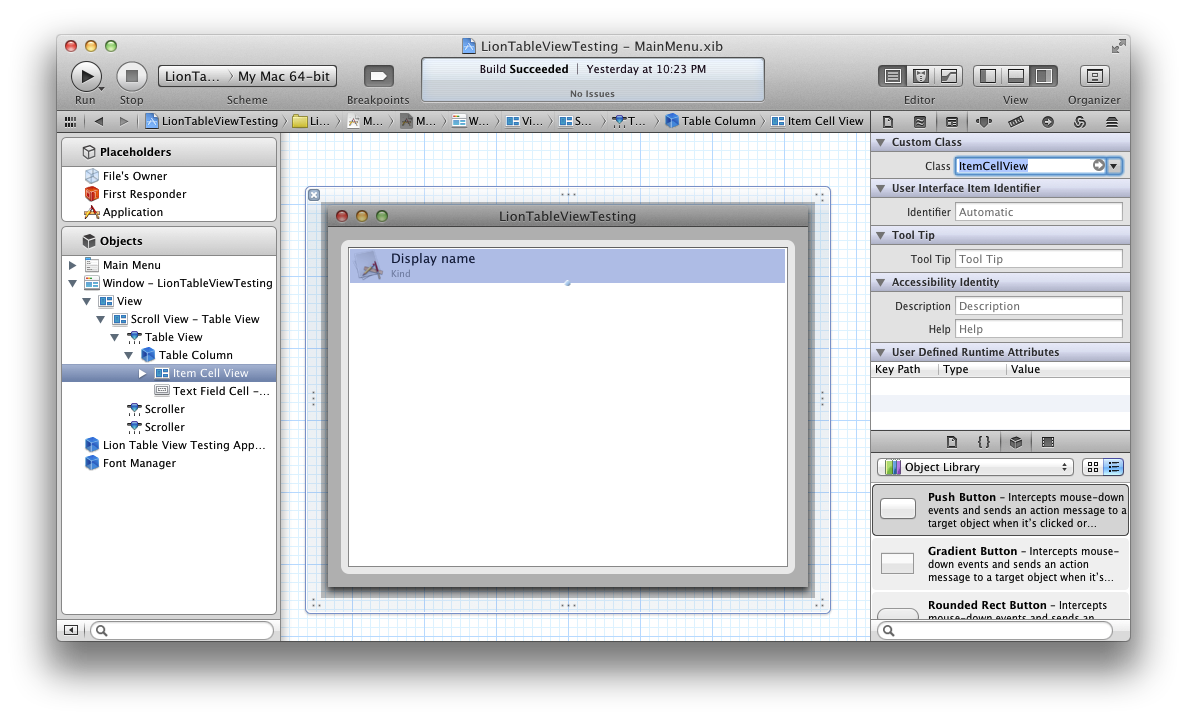
And that’s all to it! Of course we have to tell the table view to use
our class instead of NSTableCellView. To do that, open MainMenu.xib,
select the cell view and change it’s Class to ItemCellView in
identity inspector as shown here:
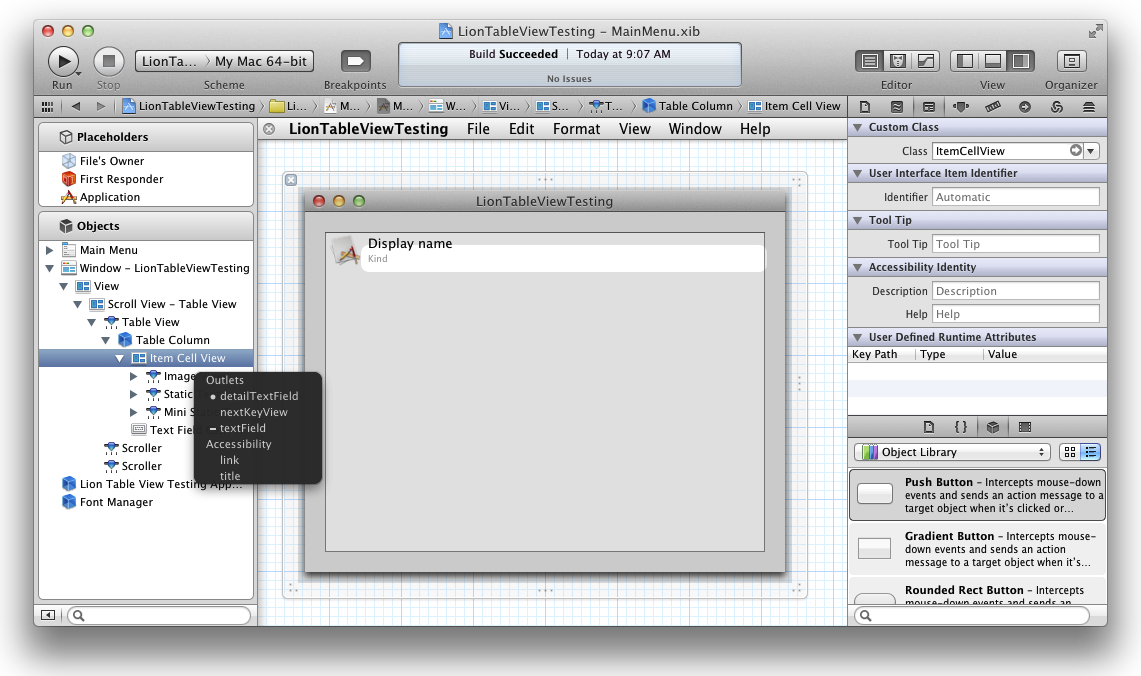
We also need to link the detail label with the outlet we created above,
so control-drag from table cell view to label and connect it to
detailTextField as shown here:

And finally, we need to update tableView:viewForTableColumn:row: to
pass it the value:
- (NSView *)tableView:(NSTableView *)tableView viewForTableColumn:(NSTableColumn *)tableColumn row:(NSInteger)row {
    ItemCellView *result = [tableView makeViewWithIdentifier:tableColumn.identifier owner:self];
    Item *item = [self.items objectAtIndex:row];
    result.imageView.image = item.itemIcon;
    result.textField.stringValue = item.itemDisplayName;
    result.detailTextField.stringValue = item.itemKind;
    return result;
}
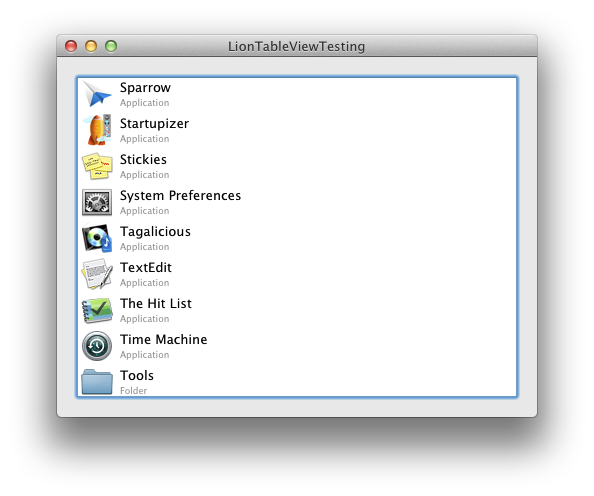
Go ahead, build and run and lo-and-behold, there’s our proper kind value (see Tools item that states Folder while the rest Application):
Simple enough. Notice how everything was done using the same methods as we used previously: even though there’s whole new API for dealing with view based table views, we can construct and wire them using the same IB and Xcode concepts as before! This is a one big argument to why Apple’s SDK is (one of?) the best out there. Their attention to detail doesn’t stop at user interface level!
Check LionTableViewTesting2 project for complete code. At this point, we can call it a day and ship our new product with mighty powerful view based table views.
Polishing our table view (example 3)
Steps at a glance:
- Override
ItemCellViewsetBackgroundStyle: - Write code that changed detail text color according to style
Playing with our app, we notice something: when a row is selected, the kind label stays gray while name label changes to white:
You might argue that’s barely visible and the text is still very readable, and you’d be right, (most) users probably just won’t notice. But one part of you just can’t accept it, it doesn’t feel right, it doesn’t feel “Mac”. One of the things I noticed straight away after switching to Mac years ago was above mentioned attention to detail. Not only by Apple, but also in indie developers apps. We’d like to have details label text color lighter when selected. It would add that small touch that would make our app more polished.
There are several ways of doing it. Perhaps the simplest would be to
respond to NSTableViewDelegates tableViewSelectionDidChange: and
update all visible rows. But as we already have our custom
NSTableCellView subclass, we can do it in proper OOP/MVC fashion by
embedding the knowledge of view inside the view subclass itself. Looking
at the available API for the NSTableCellView class, there isn’t many
methods, but one that looks promising is backgroundStyle. Reading it’s
documentation
confirms it, so let’s try this route. We’ll override the setter and add
our custom logic there:
- (void)setBackgroundStyle:(NSBackgroundStyle)backgroundStyle {
    NSColor *textColor = (backgroundStyle == NSBackgroundStyleDark) ? [NSColor windowBackgroundColor] : [NSColor controlShadowColor];
    self.detailTextField.textColor = textColor;
    [super setBackgroundStyle:backgroundStyle];
}
And selecting a row in this version, yields much nicer looking results (click on image to get before/after side by side):
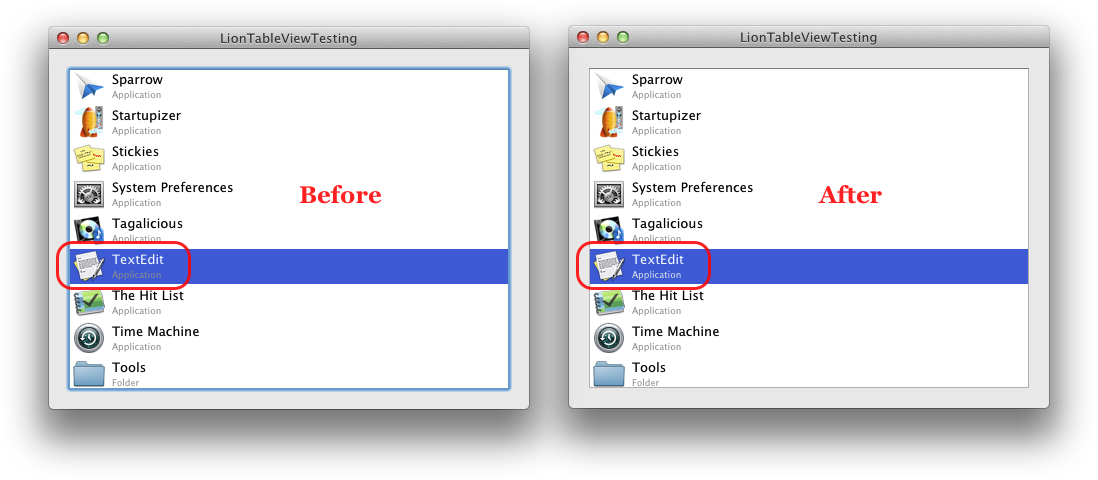
Check LionTableViewTesting3 project for complete code.
We could also implement this with custom NSTextField subclass,
responding to setBackgroundStyle: method and changing color in there.
This might be useful if we wanted to reuse the same look and feel
throughout many custom table view cells. But for most reasonably complex
apps, above solution should be good enough.
Even though most users won’t notice the color change, the app would “feel” more polished to them too. And in contrast with the SDKs I’ve been using for years in other platforms (various flavors of C++, .NET, WPF…), Cocoa APIs noticeably reduce the amount of work required for dealing with “low level” stuff, so we can direct more attention to user interface/experience and polish!
Conclusion
Using view based table views is not that much different from using
old-style, cell based, table views, but it provides a lot more
customization opportunities. At the same time, you can do much more work
within IB which not only provides simpler and quicker way of handling
the table, but also requires a lot less code. Think of all those custom
NSCell subviews and all the drawing code you had to write.
This post only serves as a quick intro, you should definitely check View Based NSTableView WWDC 2011 video and Apple’s table view playground sample code which served as the basis for this post.
Hope this post will help you get to speed with table views. Hopefully you’ve enjoyed reading as much as I did writing it… In part 2, we’ll take a look at bindings and animated row resizing.